Usage
To start off, you must grab the following information:
The above information is required in order to publish and sync data to your application on your behalf.
const = await new (
"<insert client ID>",
"<insert client token>",
)const = await new (
.. ?? "",
.. ?? "",
)CLIENT_ID="<insert client ID>"
CLIENT_SECRET="<insert client secret>"Creating a Widget
Currently, an application can only have at most one widget. If this changes, discord-widgets is equipped for multiple widgets.
Widgets are based upon the Widget class.
Prop
Type
The above are all of the functions that are usable in a Widget class. Each function mentions a specific widget surface that can be configured (besides massAssignedImage). By default, the Discord API requires that you have topWidget, bottomWidget & templateWidget surfaces all intact and valid to be considered a valid widget.
.topWidget
The .topWidget function is the representation of the top portion of a widget. The top of a widget comes in two types: hero, and contained.
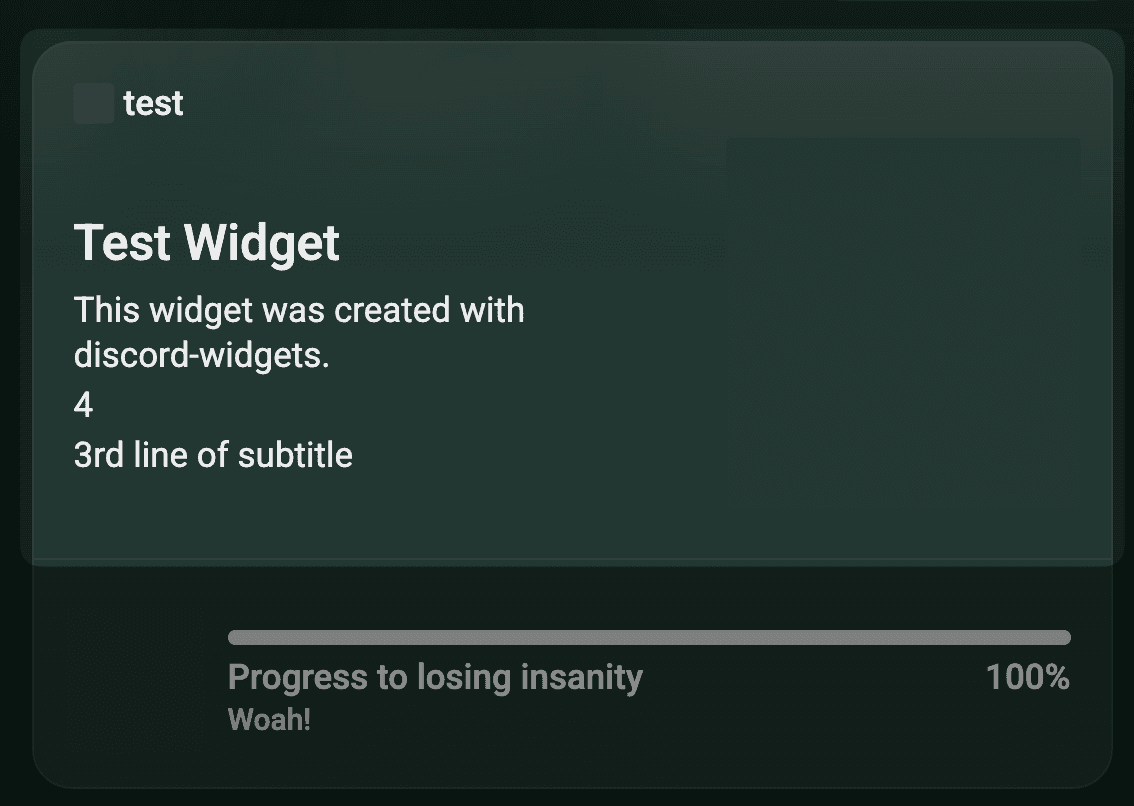
For example, an example of a .topWidget surface that is valid is as such:
import { , , } from "discord-widgets";
new ("Display Name")
.({
: .,
: "Test Widget",
: "This widget was created with discord-widgets.",
: new ("number_specific_to_a_user").("number"),
: "3rd line of subtitle"
})This will create a top widget that appears with a title, and multiple subtitle lines which are separated by completely separate fields, along side being contained, meaning that it will show a smaller, contained image on the widget rather than an edge-to-edge image.
Prop
Type
.bottomSheet
The .bottomSheet comes in different forms, but usally is where most of the valuable content is stored in a widget. It can contain useful data like a score or statistics about a certain application.
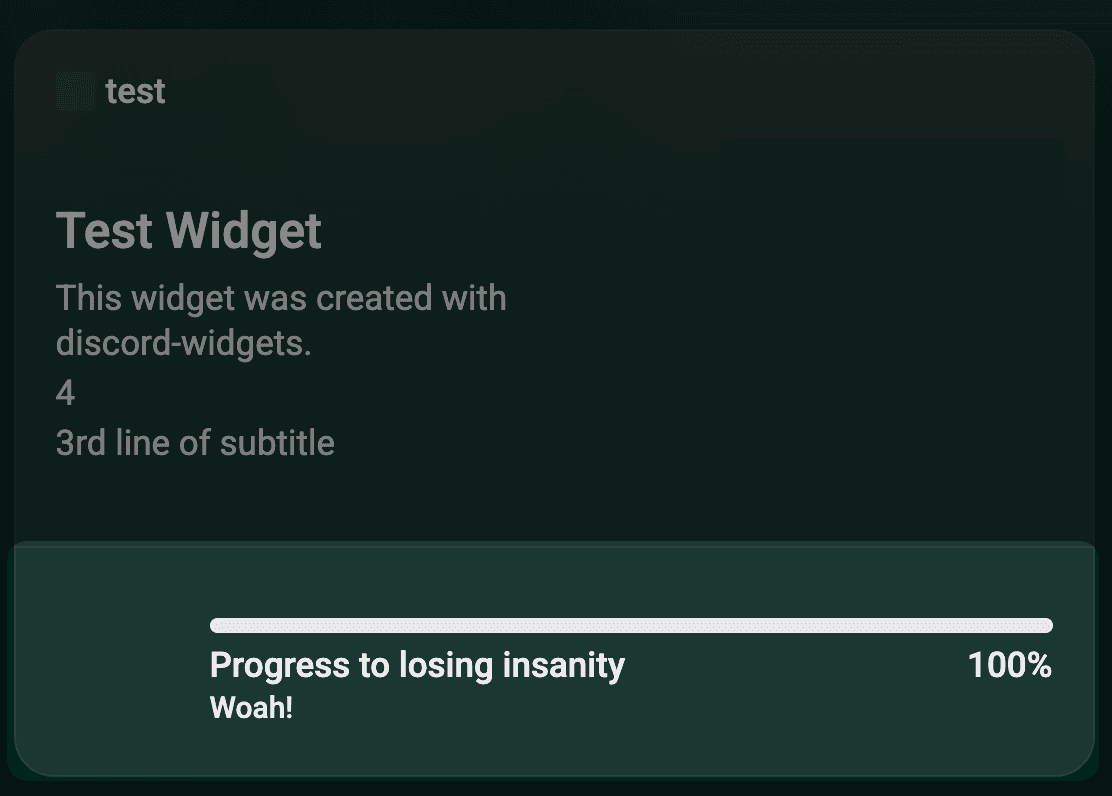
Bottom widgets in practice would look different depending on the type. There are three types of bottom widgets: Progress, StatGrid and Collection.
Progress type
import { , , } from "discord-widgets";
new ("Display Name")
.({
: .,
: new ("numbers_can_be_preassigned", "1"),
: "Progress to losing insanity",
: "Woah!"
})The Progress bottom sheet type is the one that looks the most different technically from the three, and is showcased above. It relies on a percentage/progress bar based system to demonstrate levels, or progression towards a goal.
By default, this bottom sheet type is a percentage with 0 as the minimum value and 1 as the maximum value. However, this can be changed with the goalValue which can be used to set the maximum value. This means in theory you could have a value at maximum be 1,000, and the progress bar would adjust to that maximum automatically based on the widget's data.
As a bonus, there is a title and subtitle value which are both "one-line" fields which can be used to show additional data, usually related to the objective shown in the progress bar.
StatGrid type
import { , , } from "discord-widgets";
new ("Display Name")
.({
: .,
: [
{
: "Money",
: new ("money", "300").("number"),
},
{
: "Tokens",
: new ("tokens", "0").("number"),
: new ("image", "https://example.com")
// Icons can optionally be used.
}
]
})The StatGrid bottom sheet type is a type that shows a grid allowing up to 6 items in the grid, for an information-dense view of lots of numbers, text, etc. Icon's are optional, although are positioned to the right of the label in the item.
Technically, all 6 items are required in the API. However, discord-widgets will automatically fill in the remaining items, even if they are all empty, with spaces.
StatGrid's do not have any sort of information beyond the information shown inside of the grid items, unlike Progress.
Collection type
import { , , } from "discord-widgets";
new ("Display Name")
.({
: .,
: [
{
: "This guy is smart",
: new ("image", "https://example.com")
},
{
: "I actually doubt that",
: "Context is important.",
: new ("image", "https://example.com")
}
]
})The Collection bottom sheet type is very similar to StatGrid in regards that it also uses a grid style view for showing widgets. However, instead of allowing 6 smaller items in StatGrid, Collection-based widgets are only allowed to have four, bigger items.
Images and names are required, however unlike StatGrid's, descriptions are optional. discord-widgets, similar to StatGrid, will also fill in the remaining options in the grid with spaces if they are not in the widget configuration.
.templateWidget
The template widget is actually called the "Add Widget Preview" surface in the Discord API. This package uses the term template widget instead for clarity.
The .templateWidget surface is the simplest of the 3 required widget surfaces, with only two fields.
Prop
Type
The surface is hidden to an external viewer of the widget, and only shown once in the widget addition menu.
import { , } from "discord-widgets";
new ("Display Name")
.({
: .,
})Template widgets also have the imageUrl property, which while required, is automatically handled by massAssignedImage regardless.
.miniProfile
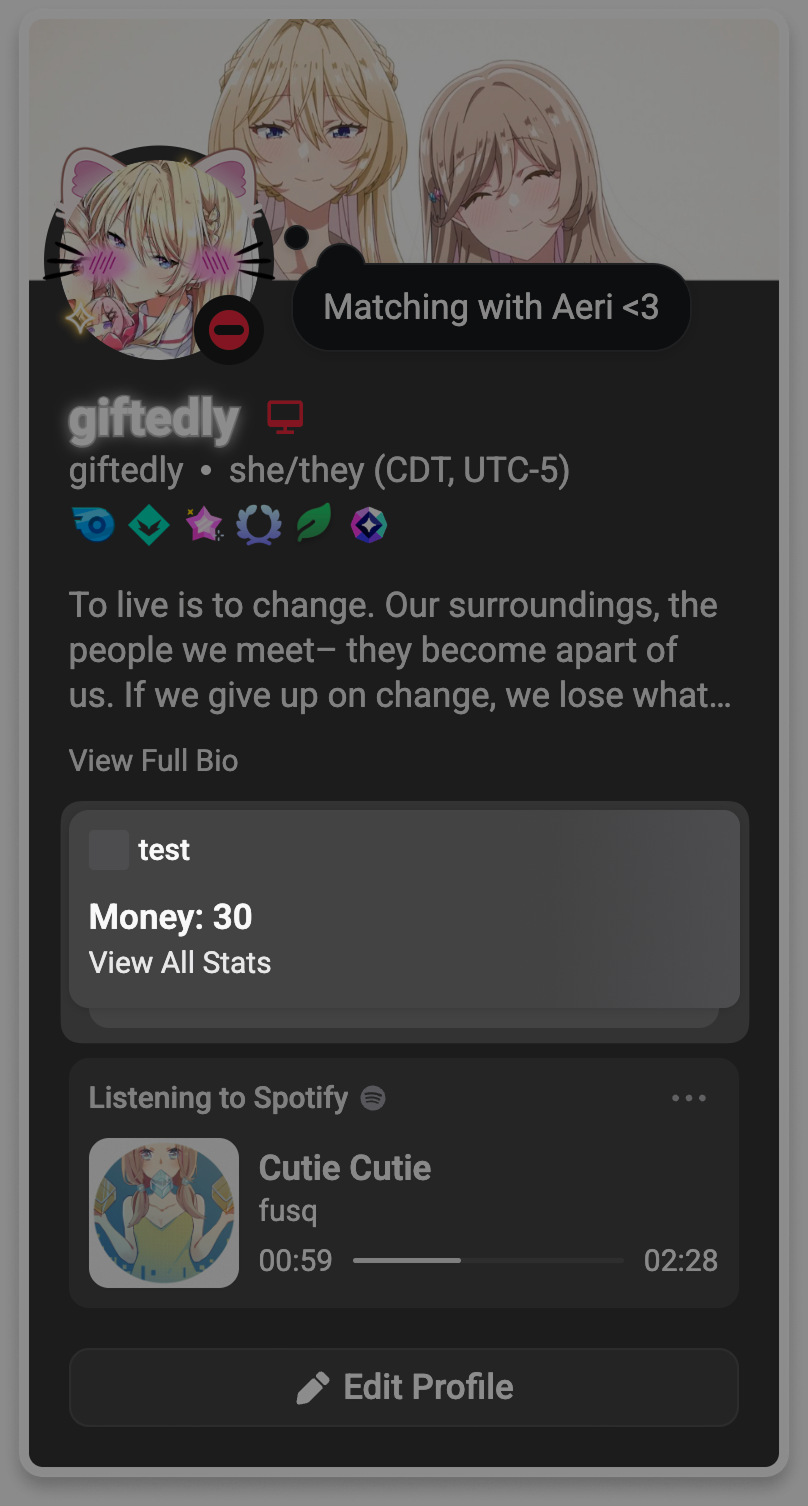
The .miniProfile surface is one of the two optional surfaces which is only visible if the widget is at the top of the users board, otherwise it does not show up in the "mini profile" of the user. It is available to usually show one big statistic on the profile to "show off skill".
import { , , } from "discord-widgets";
new ("Display Name")
.({
: .,
: {
: new ("money", "30").("number"),
: "Money"
}
})
.activityAccessory
The .activityAccessory surface is another one of the two optional surfaces which is only visible if you have a Rich Presence activity, and appears directly under the activity.
import { , , } from "discord-widgets";
new ("Display Name")
.({
: .,
: {
: new ("money", "30").("number"),
: "Money",
: new ("money_icon", "https://example.com")
}
})There is only one kind of Activity Accessory, ActivityAccessoryType.Stat, which shows a statistic under the activity as an accessory.
Putting it all together
After selecting all of the options of a widget, you can put the surfaces all together to create the widget of your dreams, and .build() that widget.
However, in order to build the widget, it must first be uploaded as a "draft" widget. This means you must either:
- Delete all existing widget configurations
- Replace an existing widget configuration (requires you to know the ID of the old widget configuration)
If you chose option 1, simply append .deleteExisting() to the builder before running the final build function.
If you chose option 2, add the ID of the old configuration inside of the build function. For example: .build("12345").
import { , , , , , } from "discord-widgets";
const = await new (
.. ?? "",
.. ?? "",
)
.(
new ("Test Widget")
.("https://example.com")
// REPLACE THIS IMAGE !!
.({
: .,
: "Test Widget",
: "This widget was created with discord-widgets.",
: new ("number_specific_to_a_user").("number"),
: "3rd line of subtitle"
})
.({
: .,
: [
{
: "This guy is smart",
: new ("image", "https://example.com")
},
{
: "I actually doubt that",
: "Context is important.",
: new ("image", "https://example.com")
}
]
})
.({
: .,
})
)
.()import { , , , , , } from "discord-widgets";
const = await new (
.. ?? "",
.. ?? "",
)
.(
new ("Test Widget")
.("https://example.com")
// REPLACE THIS IMAGE !!
.({
: .,
: "Test Widget",
: "This widget was created with discord-widgets.",
: new ("number_specific_to_a_user").("number"),
: "3rd line of subtitle"
})
.({
: .,
: [
{
: "This guy is smart",
: new ("image", "https://example.com")
},
{
: "I actually doubt that",
: "Context is important.",
: new ("image", "https://example.com")
}
]
})
.({
: .,
})
)
.()
.()import { , , , , , } from "discord-widgets";
const = await new (
.. ?? "",
.. ?? "",
)
.(
new ("Test Widget")
.("https://example.com")
// REPLACE THIS IMAGE !!
.({
: .,
: "Test Widget",
: "This widget was created with discord-widgets.",
: new ("number_specific_to_a_user").("number"),
: "3rd line of subtitle"
})
.({
: .,
: [
{
: "This guy is smart",
: new ("image", "https://example.com")
},
{
: "I actually doubt that",
: "Context is important.",
: new ("image", "https://example.com")
}
]
})
.({
: .,
})
)
.("12345")Publishing & Finalizing Widget
After creating the draft of that widget, you are now left with a SingleUserPostWidgetsJS object, which is the final object in the widget lifecycle. This will allow you to stack operations together which will finish off the widget data and allow for constant syncing.
Prop
Type
.logOAuthURL() & .serveAndWait()
Discord requires that you:
- Have the user you'd like to sync to be authorized under atleast the
sdk.social_layerscope. - Execute the
/oauth2/tokenendpoint atleast once with the result of the aforementioned.
Why the sdk.social_layer scope?
Discord requires in order to push sync data to widgets that they have this scope. While it might seem excessive from a user's perspective with the excessive amount of data collection it can execute (sending messages on their behalf, seeing friends list, etc.), this is only because the sdk.social_layer scope is a "one size fits all" scope which incorporates multiple abilities which would only be required by games with the Social SDK.
However, in order to actually use this intent, you must apply to use the Social SDK. You can put fabricated data in since Discord most likely doesn't actually look at the data, but you must simply just get access to the SDK in order to use the scope. Technically, you only need the scope to sync data, and not to publish widget configurations, but that would leave the widget noticably blank and only visible to yourself.
You must have the http://localhost:3920/authorize redirect URL added in the OAuth section of your application for these methods to work correctly.
To achieve this, optionally, discord-widgets will start a small Node.js server so that the /authorize endpoint can be addressed. discord-widgets will automatically run the widget endpoint and sync the widget as soon as that endpoint was completed, all automatically.
await
.() // https://discord.com/oauth2/authorize?client_id=...&scope=openid+sdk.social_layer&state=...&response_type=code&redirect_uri=http://localhost:3920/authorize
.("Tz_...") // <- Input your OAuth secret there!.syncAndPublish()
For most use cases, using .syncAndPublish() is likely the best idea. .syncAndPublish() takes in both userId and the schema argument, as these are both used when initially syncing data to the user of your choice.
await
.() // https://discord.com/oauth2/authorize?client_id=...&scope=openid+sdk.social_layer&state=...&response_type=code&redirect_uri=http://localhost:3920/authorize
.("Tz_...") // <- Input your OAuth secret there!
.("125..........", { : 3 }) // Input your "schema" optionallyThis will send your initial data from the CustomString's, compile them all, and automatically create a schema. From this schema, it is sent to SingleUserPostWidgetsJS where it is published. SingleUserPostWidgetsJS will then push the initial schema to your first user with .syncAndPublish(), and any other user with .sync(). Widgets actually only publishes the initial draft widget configuration, and technically isn't fully validated by Discord (as the server is the source of truth for the widget configuration validation) until it is in a "published" mode which would usually be hitting the Publish button on the Developer Dashboard, or using .syncAndPublish()/.publish() programatically.
Post-publishing
After publishing and doing the initial sync, you should be done! If you did everything right, you should have your shiny new widget!
However, if you ever want to change the information inside of the CustomString's, you can always sync data to a user after initial runtime of the widget publishing using .sync(){.ts}.
await
.() // https://discord.com/oauth2/authorize?client_id=...&scope=openid+sdk.social_layer&state=...&response_type=code&redirect_uri=http://localhost:3920/authorize
.("Tz_...") // <- Input your OAuth secret there!
.("125..........", { : 3 }) // Input your "schema" optionally
(async () => {
await .("125..........", { : 5 })
}, 4000)This example would change random_number as a number from 3 -> 5 dynamically even after initial publishing/syncing.